How to Set Up a Chess Board: A Comprehensive Guide
The game of chess is a timeless classic, a testament to strategic thinking and intellectual prowess. But before the battle of wits can begin, there’s a crucial first step that often gets overlooked: setting up the chess board. This seemingly simple task is the foundation of the game, and doing it correctly is essential to ensure fair play.
In this comprehensive guide, we’ll walk you through the process step by step, from positioning the board to placing each piece in its rightful place. Whether you’re a novice player or a seasoned veteran, this guide will serve as a useful reference to start your game on the right foot. Let’s dive in!
Step 1: Orient the Board Correctly
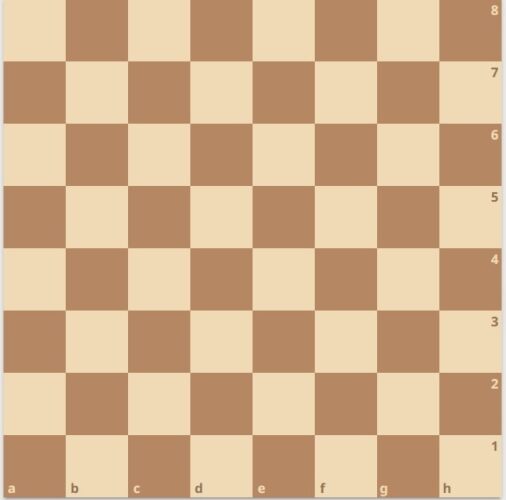
Before you place any pieces, you need to ensure the board is oriented correctly. This is a fundamental step that sets the stage for the entire game. Here’s how to do it:
- Identify the lighter square: The chess board consists of 64 squares, alternating between light and dark. The lighter square should always be on the bottom right corner of the board from each player’s perspective. This is often remembered by the phrase “white on the right.”
- Check the letters and numbers: If your board has alphanumeric coordinates (not all do), the letter ‘a’ should be on the left and the number ‘1’ should be closest to you if you’re playing as white. For black, the letter ‘a’ should still be on the left, but the number ‘8’ should be closest.
- Confirm the orientation: Once you’ve positioned the board, double-check to make sure it’s correct. The board is square, so it’s easy to accidentally rotate it 90 degrees.
Remember, the correct orientation of the board is crucial for the proper positioning of the pieces. If the board is oriented incorrectly, the pieces will end up in the wrong places, which can lead to confusion later in the game.
For more information on the basics of chess, check out our article on Basic Chess Rules.
| Do’s | Don’ts |
|---|---|
| Light square should be on the right | Don’t place the board with a dark square on the right |
| ‘a’ should be on the left | Don’t rotate the board 90 degrees |
| Double-check the orientation | Don’t rush through this step |
Remember, the game of chess is all about precision and attention to detail. Starting with the correct board orientation sets the tone for the rest of the game.
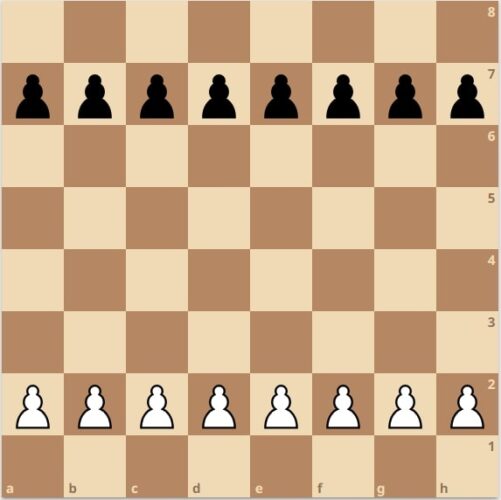
Step 2: Position the Pawns
Once the board is correctly oriented, it’s time to place the pawns. Pawns are the foot soldiers of your chess army and form the first line of defense. Here’s how to set them up:
- Identify the pawns: Pawns are the smallest pieces in your set. Each player starts with eight pawns.
- Position the pawns: Pawns are positioned on the second rank (or row) of each player. For Player 1 (White), the pawns go on the second row from the bottom (row 2), filling up the squares from A2 to H2. For Player 2 (Black), the pawns go on the second row from the top (row 7), filling up the squares from A7 to H7.
- Confirm the placement: Once all the pawns are placed, double-check to make sure they’re in the correct positions. Each player should have a row of pawns directly in front of their other pieces.
Pawns may be the smallest pieces on the board, but they play a crucial role in the game. They can block attacks from enemy pieces, capture opposing pawns and pieces, and even be promoted to any other piece (except the king) if they reach the other side of the board.
For more insights into the strategic use of pawns in chess, check out our article on Chess Opening Principles.
| Do’s | Don’ts |
|---|---|
| Place the pawns on the second rank | Don’t place the pawns on the first rank |
| Fill up the squares from A to H | Don’t leave any gaps in the pawn line |
| Double-check the pawn placement | Don’t overlook the importance of pawns |
Remember, every piece in chess, no matter how small, has its part to play. Understanding the role of each piece is key to mastering the game.
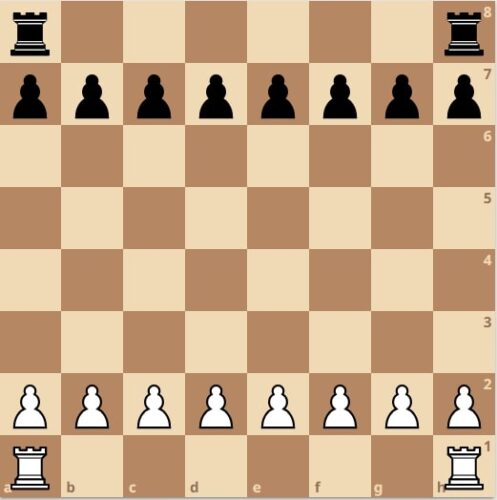
Step 3: Place the Rooks
With the pawns in place, it’s time to position the rooks. The rooks, also known as castles, are powerful pieces that can move any number of squares along a rank or file. Here’s how to set them up:
- Identify the rooks: The rooks are usually tower-shaped pieces. Each player starts with two rooks.
- Position the rooks: The rooks are positioned on the corners of the board. For Player 1 (White), the rooks go on squares A1 and H1. For Player 2 (Black), the rooks go on squares A8 and H8.
- Confirm the placement: Once the rooks are placed, double-check to make sure they’re in the correct positions. Each player should have a rook on each corner of their side of the board.
Rooks are particularly powerful in the endgame when they can control large areas of the board and support each other. They also play a key role in the special move called castling, which involves a rook and the king.
For more information on the strategic use of rooks and the special move of castling, check out our article on Endgame Rook vs Pawn.
| Do’s | Don’ts |
|---|---|
| Place the rooks on the corners | Don’t place the rooks in the middle of the board |
| Double-check the rook placement | Don’t forget about the power of the rooks |
Remember, the rooks are one of your most powerful assets in chess. Positioning them correctly from the start can set you up for a strong endgame.
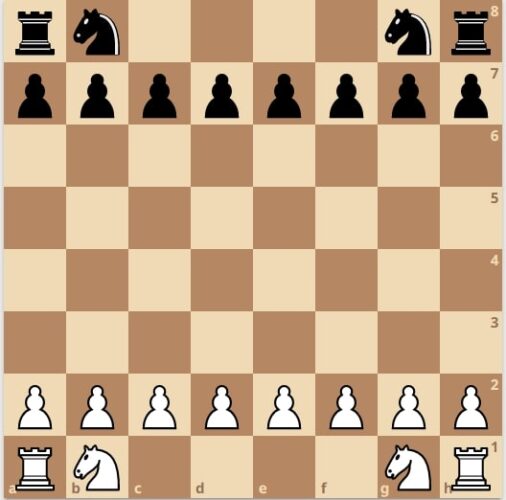
Step 4: Set Up the Knights
Next, we move on to the knights. The knights are unique in their movement, as they are the only pieces that can ‘jump’ over others. Here’s how to set them up:
- Identify the knights: The knights are usually horse-shaped pieces. Each player starts with two knights.
- Position the knights: The knights are positioned next to the rooks. For Player 1 (White), the knights go on squares B1 and G1. For Player 2 (Black), the knights go on squares B8 and G8.
- Confirm the placement: Once the knights are placed, double-check to make sure they’re in the correct positions. Each player should have a knight next to each rook.
Knights are incredibly versatile pieces and can be particularly tricky for your opponent to deal with. Their ability to jump over other pieces allows them to control the board in unique ways.
For more insights into the strategic use of knights in chess, check out our article on Why is the Knight Important in Chess.
| Do’s | Don’ts |
|---|---|
| Place the knights next to the rooks | Don’t place the knights in the corners |
| Double-check the knight placement | Don’t underestimate the power of the knights |
Remember, the knights’ unique movements can give you a significant advantage in the game. Positioning them correctly from the start can help you control the board effectively.
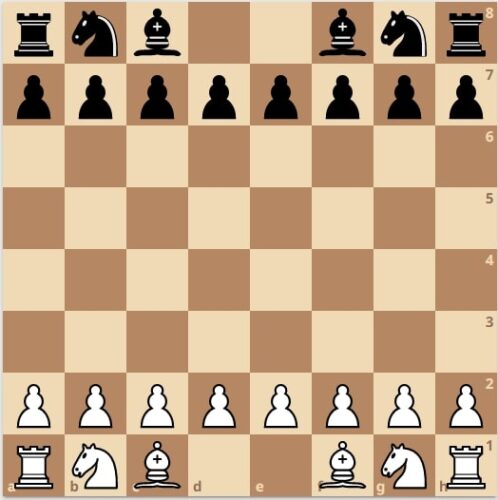
Step 5: Position the Bishops
After the knights, it’s time to position the bishops. The bishops can move any number of squares diagonally. Here’s how to set them up:
- Identify the bishops: The bishops usually have a miter-shaped cut on the top. Each player starts with two bishops.
- Position the bishops: The bishops are positioned next to the knights. For Player 1 (White), the bishops go on squares C1 and F1. For Player 2 (Black), the bishops go on squares C8 and F8.
- Confirm the placement: Once the bishops are placed, double-check to make sure they’re in the correct positions. Each player should have a bishop next to each knight.
Bishops can control the board from a distance, as they can move across the board in a single move. They are particularly powerful when they can control long diagonals.
For more insights into the strategic use of bishops in chess, check out our article on Checkmate with Bishop and Knight.
| Do’s | Don’ts |
|---|---|
| Place the bishops next to the knights | Don’t place the bishops in the corners |
| Double-check the bishop placement | Don’t underestimate the power of the bishops |
Remember, the bishops’ long-range movement can give you a significant advantage in the game. Positioning them correctly from the start can help you control the board effectively.
Step 6: Place the Queen
Now, it’s time to place the queen, one of the most powerful pieces on the chessboard. The queen can move any number of squares along a rank, file, or diagonal. Here’s how to set her up:
- Identify the queen: The queen is usually the second tallest piece, often with a crown. Each player starts with one queen.
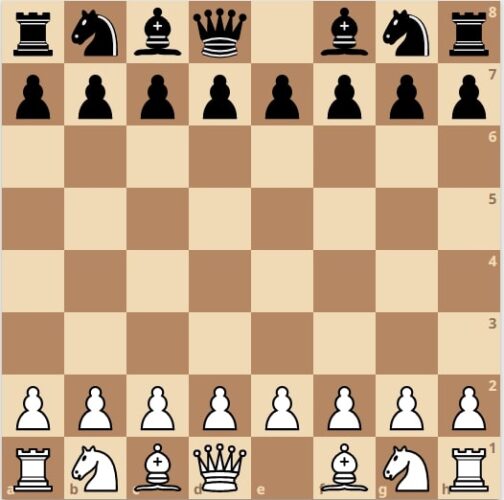
- Position the queen: The queen is positioned next to the bishop on her own color. For Player 1 (White), the queen goes on square D1. For Player 2 (Black), the queen goes on square D8.
- Confirm the placement: Once the queen is placed, double-check to make sure she’s in the correct position. Each player should have the queen on her own color.
The queen is a major piece and has the most mobility, as she can move in any direction. The queen can often be used to form powerful attacking combinations with other pieces.
For more insights into the strategic use of the queen in chess, check out our article on Queen vs Pawn Endgame.
| Do’s | Don’ts |
|---|---|
| Place the queen on her own color | Don’t place the queen on the wrong color |
| Double-check the queen placement | Don’t underestimate the power of the queen |
Remember, the queen’s versatility can give you a significant advantage in the game. Positioning her correctly from the start can help you control the board effectively.
Step 7: Position the King
Finally, it’s time to position the king. The king can move one square in any direction. Here’s how to set him up:
- Identify the king: The king is usually the tallest piece, often with a cross on the top. Each player starts with one king.
- Position the king: The king is positioned next to the queen. For Player 1 (White), the king goes on square E1. For Player 2 (Black), the king goes on square E8.
- Confirm the placement: Once the king is placed, double-check to make sure he’s in the correct position. Each player should have the king next to the queen.
The king is the most important piece on the chessboard. If your king is checkmated, you lose the game. Therefore, the safety of the king is paramount.
For more insights into the strategic use of the king in chess, check out our article on Can a King Kill a King in Chess?.
| Do’s | Don’ts |
|---|---|
| Place the king next to the queen | Don’t place the king in the corners |
| Double-check the king placement | Don’t underestimate the importance of the king |
Remember, the safety of the king is crucial in chess. Positioning him correctly from the start can help you avoid early checkmates.
Checking Your Setup
Once you’ve placed all the pieces on the board, it’s important to double-check your setup. Here’s what to look for:
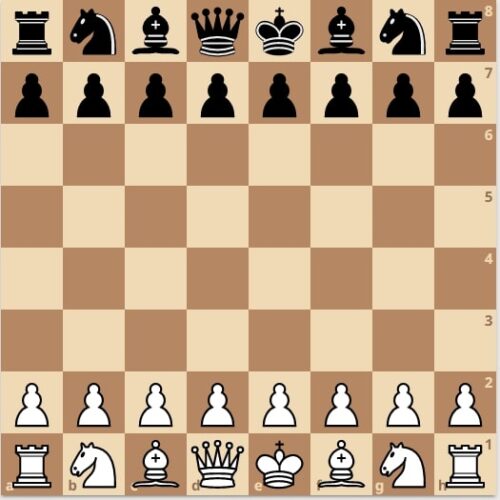
- Correct placement: Make sure all the pieces are on the correct squares. The pawns should be on the second rank for White and the seventh rank for Black. The rooks, knights, bishops, queen, and king should be on the first rank for White and the eighth rank for Black.
- Queen on her color: The queen should be on her own color. The white queen should be on a white square, and the black queen should be on a black square.
- King next to the queen: The king should be next to the queen. The white king should be on E1, and the black king should be on E8.
- Rooks in the corners: The rooks should be in the corners of the board.
If you’re unsure about any of the rules or piece movements, you can refer to our Basic Chess Rules guide.
Conclusion
Setting up a chess board correctly is the first step towards a successful game. It’s not just about placing the pieces on the board, but understanding the roles and potential of each piece. Whether you’re a beginner or an experienced player, it’s always good to review the basics and ensure you’re starting your game on the right foot.
Remember, chess is not just a game of strategy, but also a game of learning and growth. As the famous saying goes, “Every chess master was once a beginner.” So, keep practicing, keep learning, and most importantly, enjoy the game!
For more chess tips and strategies, check out our Chess Tips for Beginners and How Do Chess Players Think? articles. You can also learn more about the history and evolution of chess in our article on The History of Chess & Its Evolution.
Remember, the journey of a thousand miles begins with a single step. Or in this case, a single move. Happy playing!
For further reading, you can check out the official rules from the International Chess Federation (FIDE).
FAQ Section
Q1: How do I set up a chess board?
A: Setting up a chess board involves placing the pieces in their correct starting positions. The rooks are placed in the corners, followed by the knights next to them, then the bishops, and finally the queen and king in the center. The queen is placed on her own color, and the king is placed next to her. The pawns are placed in front of all these pieces.
Q2: Where does the queen go on a chess board?
A: The queen is placed on her own color. For Player 1 (White), the queen goes on square D1. For Player 2 (Black), the queen goes on square D8.
Q3: Where does the king go on a chess board?
A: The king is positioned next to the queen. For Player 1 (White), the king goes on square E1. For Player 2 (Black), the king goes on square E8.
Q4: How many pieces are there on a chess board at the start of the game?
A: At the start of the game, there are 32 pieces on the chess board – 16 for white and 16 for black. Each player has 1 king, 1 queen, 2 rooks, 2 knights, 2 bishops, and 8 pawns.
Q5: What is the correct order of pieces on a chess board?
A: From left to right, the pieces should be arranged as follows: rook, knight, bishop, queen, king, bishop, knight, and rook. The pawns are placed in the row in front of these pieces.
Q6: Why is it important to set up the chess board correctly?
A: Setting up the chess board correctly is important because the initial position of the pieces is fundamental to the strategies and tactics in the game of chess. Incorrect placement of pieces can lead to an unfair advantage or disadvantage and can disrupt the flow of the game.
Q7: Can you adjust a piece after you’ve moved it in chess?
A: Once a piece is released on a square, the move is considered made. However, if a player wishes to adjust a piece on its square without intending to move it, they should announce “J’adoube” or “I adjust” before touching the piece.