Endgame: Rook vs Pawn
Number two in this new series is aimed especially at club players. Several people have written to me that several books really meet the criteria that I outlined before.
One of the books worth mentioning is ‘Fundamental Chess Endings’ by Karsten Müller & Frank Lamprecht from Hamburg. It enlightens the interested chess student by explaining the principles of various basic positions in an exemplary way.
The chapter ‘How can we teach Endings’ from the book ‘Chess Coaching’ by John Littlewood also seems to be worth your while.
Earlier, we found that a lack of knowledge spoils many endgames. We indicated the importance of knowing whether a position is lost or drawn.
In this section, we will discuss the endgame of rook vs pawn. Although the rook is a much stronger piece than a pawn, there are many positions in which the pawn side can still draw. Careful study of these cases will provide insight into this type of endgame.
Let us first formulate a few basic rules that may prove useful.
- The rook should be positioned behind the pawn;
- The stronger side cannot win without the help of the king;
- The weaker side’s king must try to keep the enemy king away.
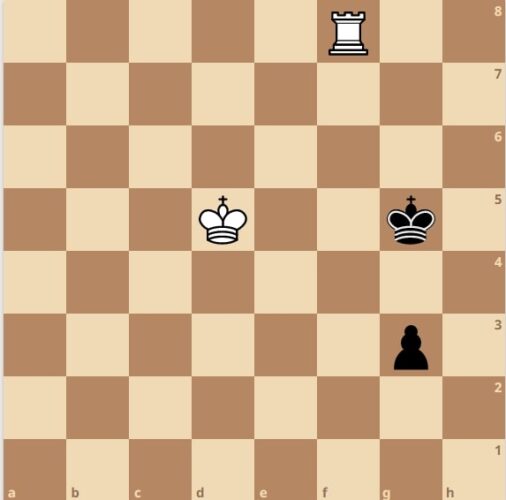
Position 1
This position, with White to move, is won. White is just in time to stop the pawn from promoting.
1. Kb5 Kh3
A slightly better defense would be 1… Kg3, but it loses anyhow: 2. Kc4 Kf3 3. Kd3 g3 4. Tf8+ Kg2 5. Ke2 Kh2 6. Tg8 Kg2 7. Tg7 Kh2 8. Kf3.
2. Kc4 g3 3. Kd3 Kh2 4. Ke2 g2 5. Kf2 1-0
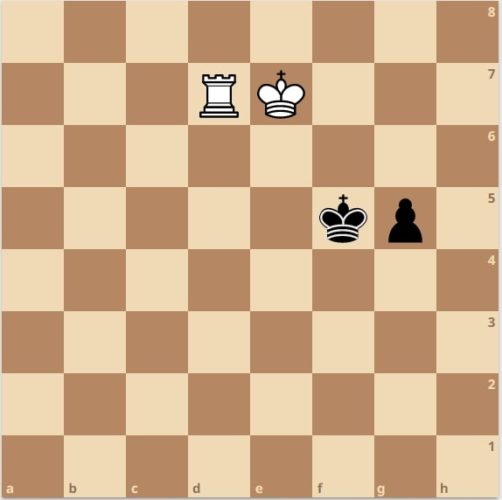
Position 2
It seems unlikely that White can still win this position, however…
1. Rg5!!
Forces the black king to defend his pawn from the ‘wrong side’. White is just in time.
1… Kb6 2. Kg7 Ka5 3. Kf6
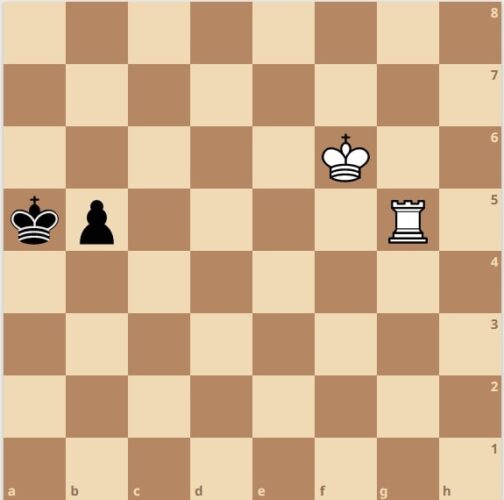
3… Kb4
3… Ka4 does not give Black the slightest chance after 4. Ke5 b4 5. Kd4 b3 6. Kc3.
4. Ke5 Kc4 5. Rg4+ Kc3 6. Kd5 b4 7. Rc4+ Kb3 8. Kc5 1-0
The importance of White’s first move becomes clear when Black plays 1. … b4. The pawn and king are separated, which means that White has all the time in the world to move in with his king. The pawn relies on the king’s help. Without it, it cannot move forward, for instance: 2. … b3 3. Rg3 b2 4. Rb3. That brings us to a new principle for our list:
- If the king and pawn are separated by the rook, the rook side wins easily.
The rook is not always in its ideal place, behind the pawn. Sometimes it is positioned on the bottom rank. Usually, this makes the win a little harder.
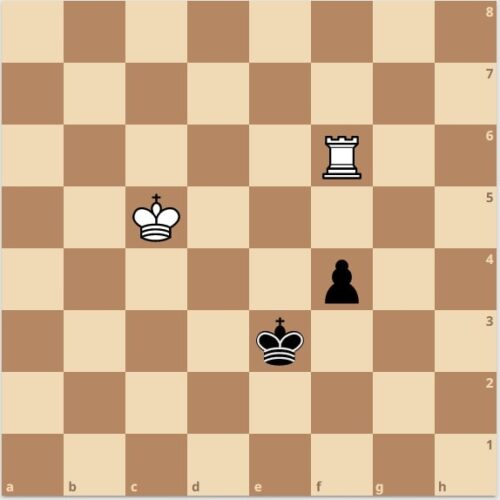
Position 3
With White to move, there are no difficulties.
1. Kd6 e3 2. Kd5 Kf3 3. Kd4 e2 4. Kd3 Kf2 5. Kd2 (1-0)
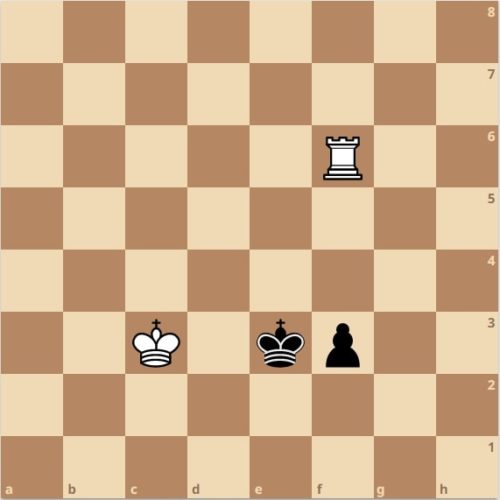
Black to move can achieve the draw quite easily.
Black to play draws.
1… e3 2. Kd6 Ke4 3. Kc5 Kd3
And Black denies his colleague entry into the area where the action is.
½ – ½
Here too, we notice how one single tempo can make the difference between a win or a draw. This is exactly why studying endgames is so important. The slightest nuance can influence the outcome of the game. The following position is a nice example.
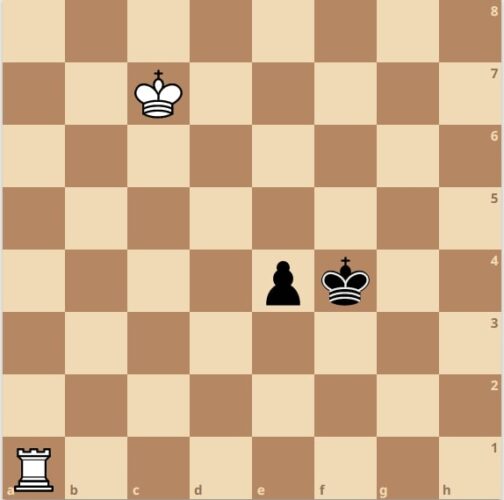
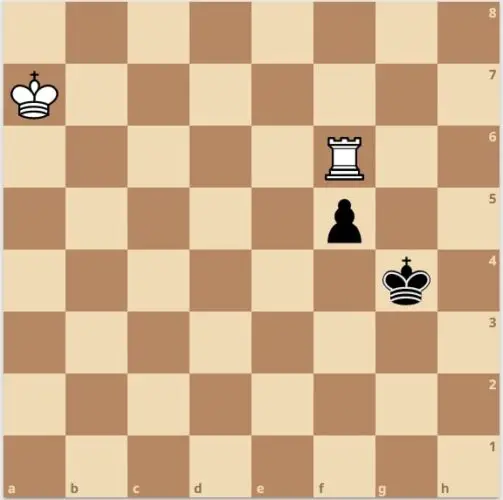
Position 4
1. Td1+!
If we try 1. Kf7, White is just too late: 1… e4 2. Kf6 Kd3 3. Kf5 Kd2! This is the important tempo that enables Black to rescue the half point. 4. Ta1 e3 5. Kf4 e2 and the king arrives too late to stop the pawn.
1… Kc3 2. Te1 Kd4
This way White has won a crucial tempo. Attacking the pawn is exactly what is needed to win the game.
3. Kf7 e4 4. Ke6 e3 5. Kf5 Kd3 6. Kf4 e2 7. Kf3 1-0
We can summarize this winning method in the following rule of thumb:
- By checking the enemy king, the rook’s position is improved with gain of a tempo, thereby attacking the pawn.
The next position is a famous example, where White demonstrates how he masters the intricacies of this endgame.
Lerner, Konstantin – Dorfman, Josif, Tashkent 1980.

In this game, an instructive ending was reached. White applies the technique that we have already seen.
71. Rf2!!
Without this move, Black would be able to play Kf6 and keep the white king away. Rf2 comes at the cost of a tempo, but this is of no consequence.
71… Kh6
- 71… g4 72. Rf5!, cutting the king off from the fifth rank.
- 71… Kg6 72. Kb7.
72. Kb7
The king approaches quickly.
72… g4 73. Kc6 Kg5 74. Kd5 g3 75. Rf8
The rook is now positioned ideally, behind the pawn.
75… Kg4 76. Ke4
Dorfman resigned. A possible continuation would be 76. Ke4 Kh3 77. Kf3 Kh2 78. Rh8+ and the pawn is lost.
1-0
The theme of this endgame also occurred some time ago in a Dutch ‘Meesterklasse’ competition game.
Van Kerkhof, David – Erwich, Frank (Dutch league HMC Calder – BSG)
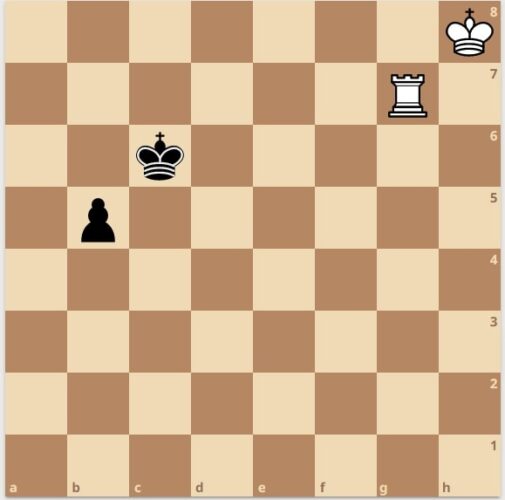
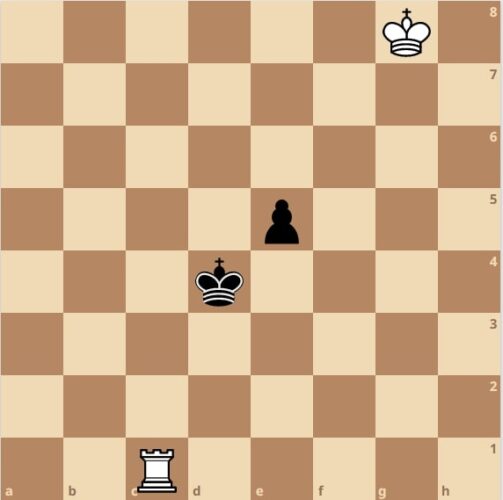
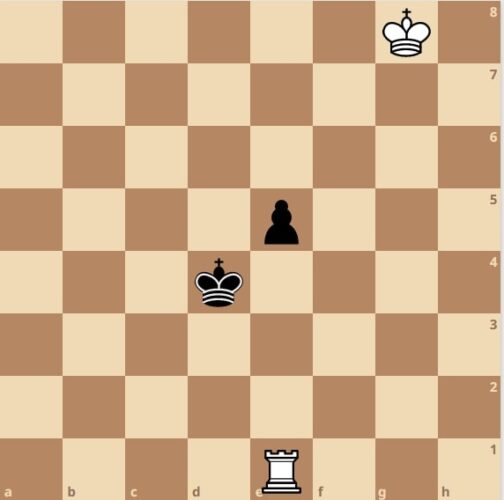
This position resulted after a hard-fought battle. Frank Erwich, who is known as an endgame expert, now had to choose between two moves: 49. … f4 or 49. … Kf4.
49… Kf4?
Wrong! Sometimes knowledge is not an asset. Erwich realized that in order to deny the enemy king access, he had to position his king on the other side of the pawn, and he decided to do so immediately. Had he calculated correctly, he would undoubtedly have seen that this manoeuvre costs a crucial tempo, losing the game.
After the immediate 49… f4! 50. Kb6 and only now switching to the other side with 50… Kf3!, Black would have been able to force a draw: 51. Kc5 Ke3 (see analysis diagram).
It is essential that after for instance 52. Re6+ Kd3! Black can keep the white king at bay: 53. Rf6 Ke3 54. Kc4 f3 55. Kc3. In this position it is important that it is Black’s move and not White’s (as was the case in the game). 55… f2, drawing the game.
50. Kb6 Ke4 51. Kc5 f4 52. Kc4 Ke3 53. Kc3 f3
Now it is White’s move. The black king is forced to the other side. Black is lost and Erwich resigned immediately after
54. Re6+ .
There could have followed: 54… Kf2 55. Kd2 Kg2 56. Rg6+ Kf1 57. Rf6 Kf2 58. Rf8 Kg2 59. Ke3 and the pawn is lost.
1-0
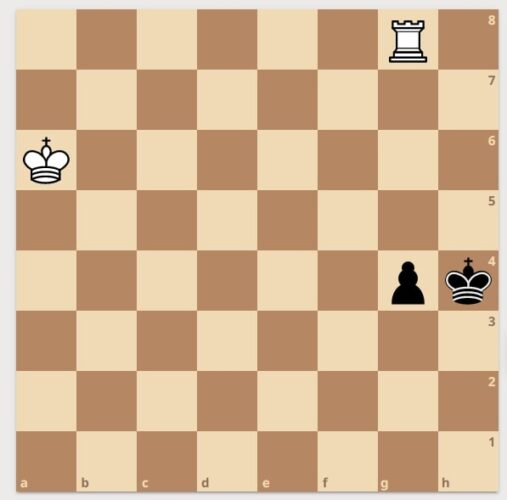
To conclude, here is a position in which you have the chance to apply the above-mentioned principles. So let’s call this an exercise.
EXERCISE
Solution
1. Kd6!
1. Kf7 Kf4 2. Kf6 g4 3. Rd4+ Kf3 4. Kf5 g3 5. Rd3+ Kf2 6. Kf4 g2 7. Rd2+ Kf1 8. Kf3 g1N+!
(see analysis diagram).
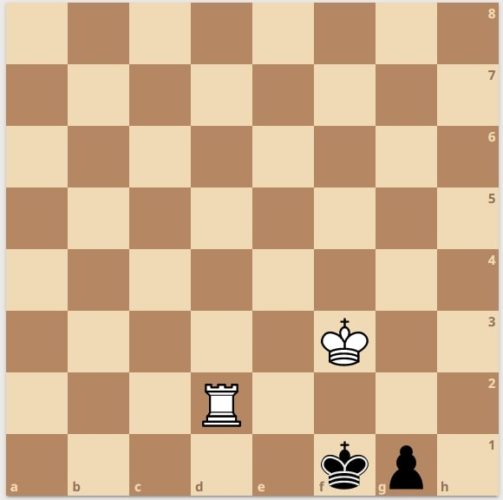
Draw. Black would only lose with the knight on a corner square.
1… g4
1… Ke4 2. Rg7 Kf4 3. Kd5 g4 4. Kd4 Kf3 5. Kd3 g3 6. Rf7+ and the black king is forced to the wrong side of the pawn.
2. Kd5 Kf4 3. Kd4 Kf3 4. Kd3 g3 5. Rf7+
And this is a position we have seen before.
5… Kg2 6. Ke2 Kh2 7. Rg7 Kg2
7… g2 8. Kf2 Kh1 9. Rh7# (Not 9. Rxg2?? stalemate!)
8. Rg8 Kh2 9. Kf3 g2 10. Rxg2+
Winning.
1-0