Endgame: Queen vs Pawn
In my first installment in this new series, I’d like to introduce you to the endgame Queen vs Pawn. At first sight, this is not a very interesting endgame because the queen will usually win against the pawn.
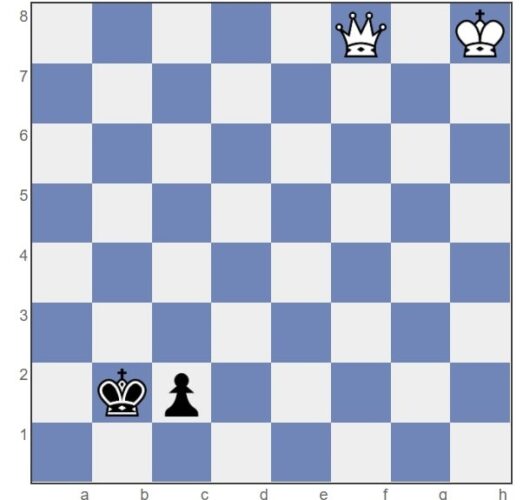
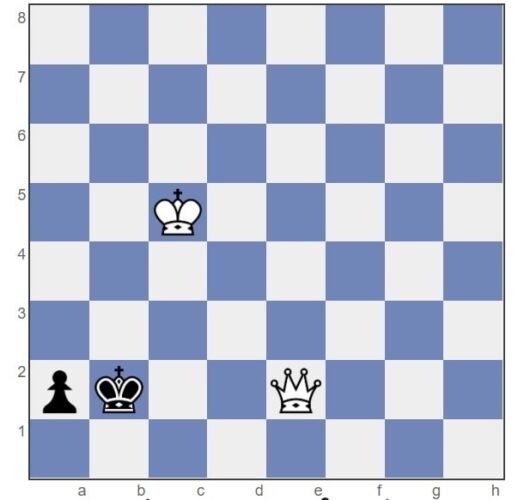
However, when the pawn has reached the penultimate rank, there are some (technical) problems. Let’s investigate the first example.
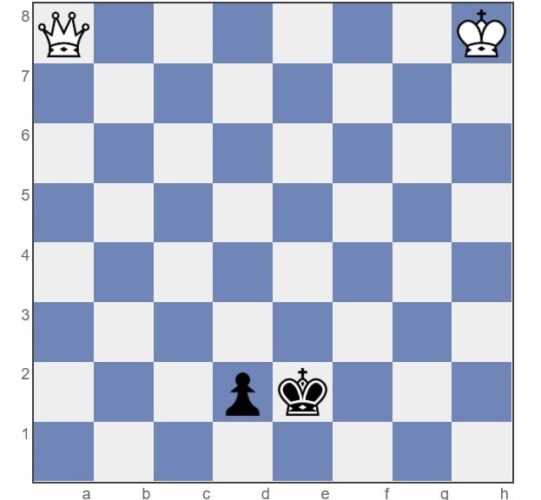
White will be unable to win without the support from his own king, so his king will have to come closer. The technique uses several checks and zugzwang maneuvers in order to compel the black king to move in front of his pawn. Promotion is then disabled for one move, and White’s king can come closer. This process is repeated until the pawn can be captured. This is how it works:
1. Qe4+ Kf2 2. Qd3 Ke1 3. Qe3+
3… Kd1 4. Kg7 Kc2 5. Qe2 Kc1 6. Qc4+ Kb2 7. Qd3 Kc1 8. Qc3+ Kd1 9. Kf6 Ke2 10. Qc2 Ke1 11. Qe4+ Kf2 12. Qd3 Ke1 13. Qe3+ Kd1 14. Ke5 Kc2 15. Qe2 Kc1 16. Qc4+ Kb2 17. Qd3 Kc1 18. Qc3+ Kd1 19. Ke4 Ke2 20. Qe3+ Kd1 21. Kd3 Kc1 22. Qxd2+
1-0
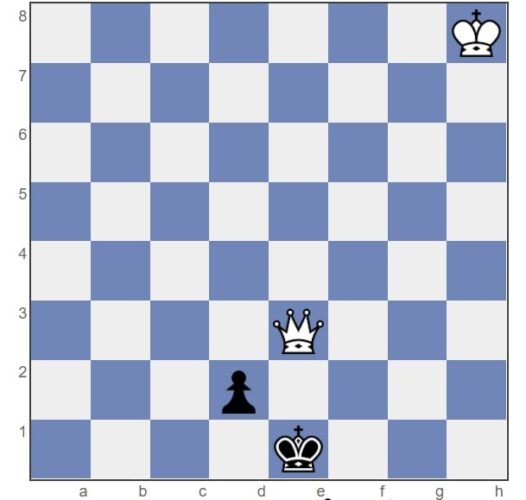
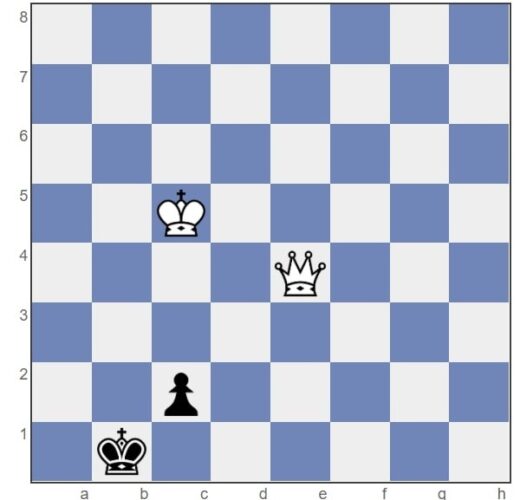
It is useful to know that White’s work is easier if the queen can occupy the promotion square. Then Black’s king is totally helpless, and White wins easily. Sometimes the position allows this:

1. Qh5! 1-0
After this move, Black cannot prevent the queen from occupying d1. Game over.
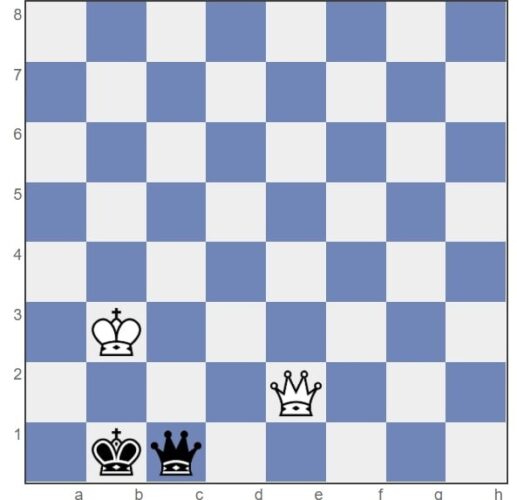
In the above positions, we examined the endgame with a black pawn on the d-file. But what if that pawn is on the c-file?
The winning method is similar to the way described earlier. However, there is an essential difference.
1. Qb4+ Ka2 2. Qc3 Kb1 3. Qb3+

Under normal circumstances, 3. … Kc1 would be called for, after which White activates his king. In the case of a c-pawn, however, there is a special circumstance that Black can exploit:
3. … Ka1! 4. Qxc2 stalemate
½ – ½
We have seen that White is unable to win against the c-pawn. This is also the case for the f-pawn and for the a- and h-pawns Black draws in all these four cases.
The rule of thumb is: rook pawns and bishop pawns guarantee the weaker side a draw, the other pawns lose against the queen. Of course, there are exceptions to these rules. If the stronger side’s king is close enough, he will win despite the ‘drawing tendencies’. In the following example,
White exploits a special motif: domination.
1. Qe2!
The pin prevents Black from queening.
1. … Kb1 2. Kb4!!
The key move. White’s king approaches and allows Black’s pawn to promote to a queen.
2. … c1Q 3. Kb3!
With this move, Black’s king is caught on the edge of the board. Notice how Black’s queen is unable to find a saving check. Endgame composers have named this phenomenon (imprisonment of the king at the edge of the board) domination.
1-0
Rook pawns also allow such maneuvers. The white king is seemingly too far away. However, with a bit of trick, he is able to reach the crucial area:
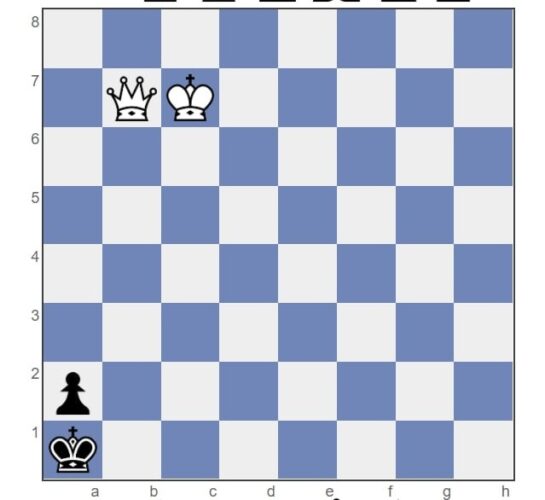
1. Kb6!!
Stalemate is prevented and Black is forced to make a move.
1. … Kb2 2. Kc5+
White reaches the critical zone with a discovered check.
2. … Kc2 3. Qe4+ Kb2 4. Qe2+
As we already saw in the last example, the White’s queen is ideally placed on the second rank.
4. … Kb1
Note that Black cannot save the situation by 4. … Kb3 due to 5. Qe5 and the queen will occupy the promotion square.
5. Kb4! a1Q 6. Kb3!
Domination once again.
1-0
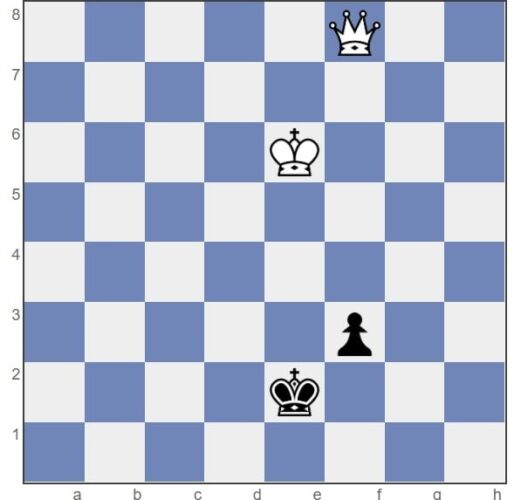
Final Verdict
1. Kf5!!
The only winning move. It will soon become apparent why the king has to vacate the e-file.
Both 1. Ke5 and 1. Kd5 is followed by 1. … f2, drawing.
1… f2 2. Qe8+!
White needs this check. On the next move, we will find out why!
2… Kd2
White also wins after 2… Kf1, as follows: 3. Kg4 Kg1 4. Kg3 f1Q 5. Qe3+ Kh1 6. Qh6+ Kg1 7. Qh2#.
3. Qb5! Ke1 4. Qb1+ Ke2 5. Qe4+! Kd2 6. Qf3 Ke1 7. Qe3+ Kf1 8. Kg4 Kg2 9. Qe2 Kg1 10. Kg3 1-0 (Study by Frink 1927.)